
Free Image Compressor: Reduce File Size Without Losing Quality

Large image files are one of the most common and most fixable, causes of slow websites, failed email attachments, and social media upload rejections. A photo straight from a camera or smartphone can easily exceed 5 MB. A blog hero image left unoptimised can single-handedly push a web page past Google's recommended load time threshold. The fix takes less than 30 seconds.
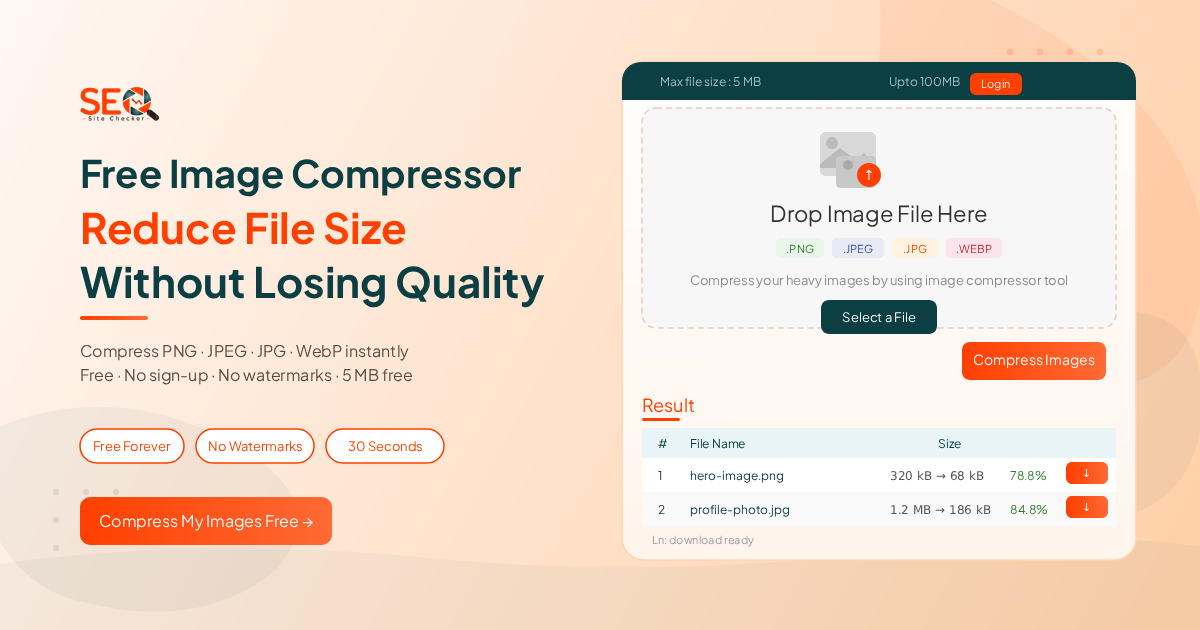
Our free Image Compressor lets you reduce the file size of PNG, JPEG, JPG, and WebP images quickly, no account required, no quality settings to configure, no complicated controls to learn. Upload your image, click one button, and download a compressed version in seconds. This guide explains what image compression is, how to use the tool step by step, which format to choose for your use case, and why compressing your images is one of the most impactful SEO improvements you can make.
What Is Image Compression?
Image compression is the process of reducing an image file's size by removing or re-encoding data within the file. The compressed image takes less storage space, loads faster on web pages, and transfers more quickly when shared by email or uploaded to social platforms. The degree of visible quality change depends on the compression method used lossy or lossless and the characteristics of the image itself.
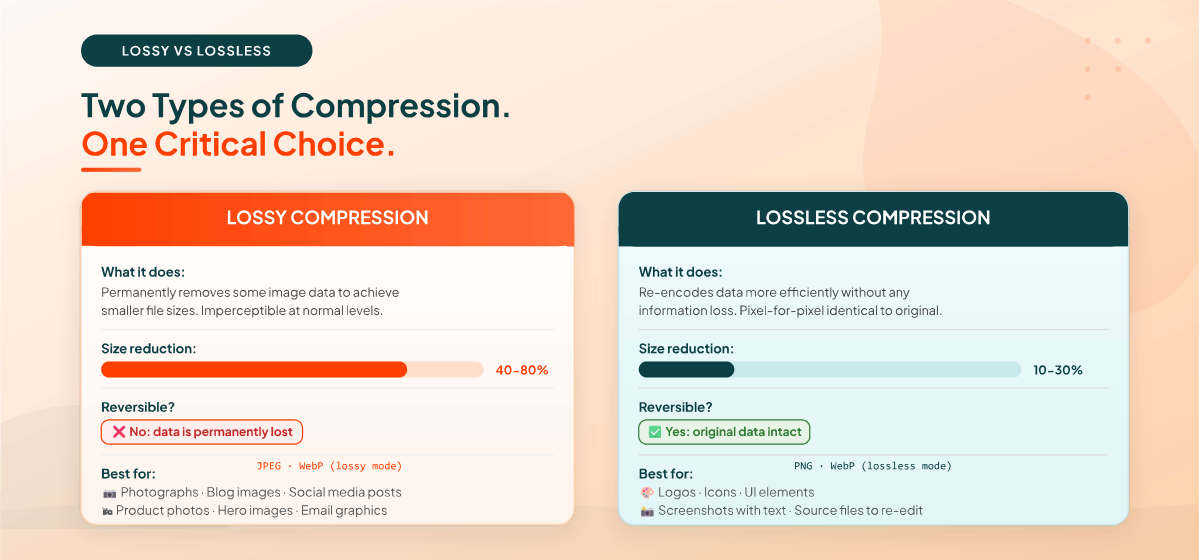
Lossy Compression: Smaller Files, Nearly Invisible Quality Trade-Off
Lossy compression permanently removes some image data to achieve the smallest possible file size. The removed data is typically imperceptible to the human eye at moderate compression levels, a photograph compressed with lossy compression at a sensible setting is visually identical to the original when displayed on screen. At aggressive compression levels, however, visible artefacts appear: blocky areas in photographs, blurred edges around text or sharp lines, and colour banding.
Lossy compression is used by the JPEG and WebP formats. It is the right choice for photographs, realistic imagery, social media posts, and web images where the goal is the smallest possible file with acceptable visual quality.
Lossless Compression: No Quality Change, Moderate Size Reduction
Lossless compression reduces file size by re-encoding the image data more efficiently without discarding any information. The decompressed image is pixel-for-pixel identical to the original, zero quality loss is possible. Lossless compression is slower and produces smaller size reductions (typically 10-30% rather than 40-80%), but it is the correct method whenever pixel accuracy matters: logos, icons, screenshots containing text, UI elements, and medical or scientific images.
PNG and lossless WebP use lossless compression. The choice between lossy and lossless should always be driven by the image's content and intended use not just the desired file size.
Lossy vs. Lossless: A Quick Decision Guide
Feature | Lossy | Lossless |
Quality change | Slight (imperceptible at normal levels) | None - pixel-perfect |
File size reduction | 40-80% typical | 10-30% typical |
Reversible? | No, data is permanently removed | Yes, original data intact |
Best for | Photos, web images, social media | Logos, icons, screenshots, text |
Formats | JPEG, WebP (lossy mode) | PNG, WebP (lossless mode) |
📌 For most web images including blog posts, hero images, and product photos, lossy compression at a sensible level produces files 50-70% smaller with no visible quality difference.
For logos, icons, and screenshots with text, use PNG (lossless) to preserve sharpness.
How to Compress Images Online for Free: Step by Step
You can compress any supported image in under 30 seconds using our free Image Compressor. No account, no quality settings to configure, no software to install. Here is exactly how it works.
Supported Formats and File Size Limits
Before uploading, check that your image meets the tool's requirements:
- Supported formats: .PNG, .JPEG, .JPG, .WEBP: the four most widely used web image formats
- Maximum file size (free): 5 MB per image
- Maximum file size (logged in): Up to 100 MB: create a free account and click Login in the top-right corner to unlock larger uploads
Step-by-Step Instructions
Step 1: Open the Image Compressor tool
Go to seositechecker.pro/image-compressor in your browser. No login or account is required for standard use, the tool opens immediately and is ready to accept files.
Step 2: Upload your image
You have two ways to load your image:
Drag and drop: Drag your image file directly onto the "Drop Image File Here" area in the centre of the tool. The tool accepts .PNG, .JPEG, .JPG, and .WEBP files up to 5 MB.
Select a File: Click the "Select a File" button below the drop zone to open your device's file browser and choose an image manually.
Step 3: Click "Compress Images"
Once your image is loaded, click the orange "Compress Images" button in the lower-right corner of the upload area. The tool processes your image immediately and displays the result below.
Step 4: Review your results in the Result table
Your compression results appear in the Result section beneath the upload area. The table shows:
No.(#) : the sequential number of each compressed file
File Name: the original filename of your uploaded image
Size: the original file size → the compressed file size, displayed as before to after (for example, 92.17 kB to 279.36 kB)
Percentage: the size change as a percentage. A negative percentage (such as -203.11%) means the file became larger rather than smaller, this can happen with already-optimised images or PNGs that are better suited to their current encoding. A positive percentage indicates the file shrank.
📌 Why might a file get larger after compression?
If the percentage shows a negative number, the tool's compression algorithm could not find
a more efficient encoding than the original. This commonly happens with:
· Images already compressed by another tool
· Small PNG files with few colours
· JPEG files saved at very low quality settings
In this case, use the original file, there is nothing to gain from the compressed version.
Step 5: Download your compressed image
Click the Download button in the rightmost column of the Result table next to your file. The compressed image saves to your device immediately. no watermarks, no additional steps, no registration required.
📌 No account needed. No quality settings to configure. No watermarks.
Upload up to 5 MB per image free or log in to compress files up to 100 MB.
What Formats Can I Compress?
Our Image Compressor supports four of the most widely used web image formats: PNG, JPEG (.jpeg), JPG (.jpg), and WebP (.webp). These four formats cover the vast majority of images used in web publishing, email, social media, and everyday digital photography. If you have images in GIF, TIFF, BMP, or RAW formats, you will need to convert them to one of the four supported formats before compressing.
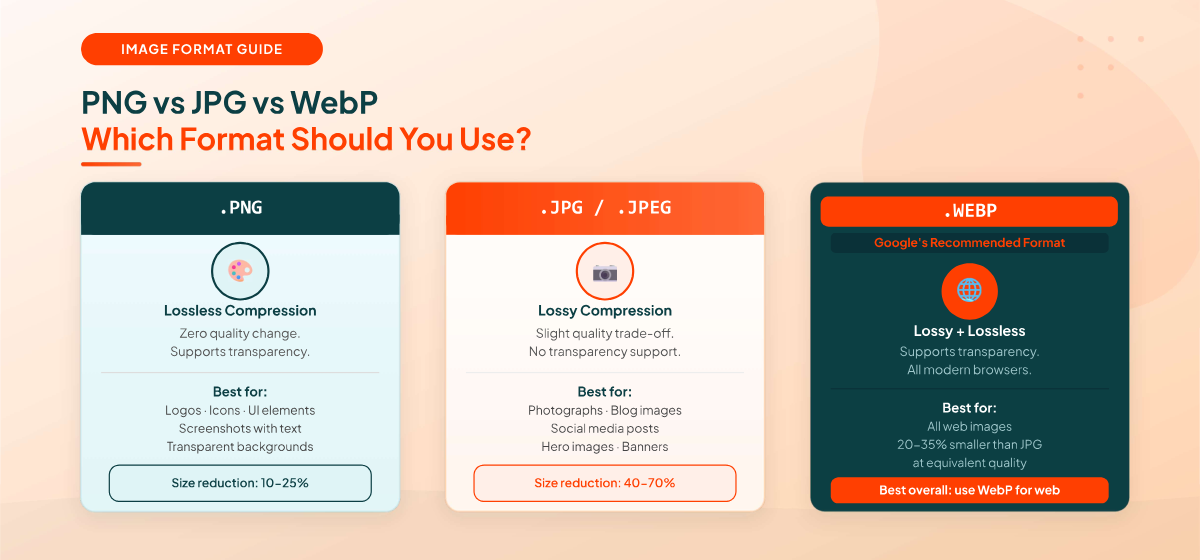
Image Formats Explained: Which Should You Use?
Choosing the right image format is as important as compressing it. Using the wrong format can mean you're carrying unnecessary file weight that compression alone can't fully resolve. Here is what each of the four supported formats is designed for and when to use it.
JPG / JPEG: Best for Photographs
JPEG is the internet's standard format for photographs and realistic imagery. It uses lossy compression by default meaning each save reduces quality slightly but produces dramatically smaller files than alternatives. JPEG does not support transparency.
Use JPEG for: blog post images, product photos, social media posts, hero images, banner photography, and any image where photographic realism matters more than sharp text or transparent backgrounds. For web use, a well-compressed JPEG should target 100-200 KB for standard content images.
PNG: Best for Graphics, Logos, and Screenshots
PNG uses lossless compression by default and supports transparency (alpha channel), making it the correct choice for logos, icons, UI elements, and screenshots containing text. PNG files are typically larger than equivalent JPEG files for photographic content, but their lossless nature means they retain every detail exactly.
Use PNG for: logos, icons, infographics, screenshots, images with text overlay, UI elements requiring transparent backgrounds, and any image that must preserve sharp edges. If a PNG image has no transparency and contains photographic content, consider converting it to JPEG or WebP for significant size savings.
WebP: Best for Web Performance
WebP is Google's next-generation image format designed specifically for web use. It supports both lossy and lossless compression, supports transparency, and produces files 20-35% smaller than equivalent JPEG at the same visual quality. WebP is supported by all modern browsers including Chrome, Firefox, Safari (since 2020), and Edge.
Use WebP for: any web image where maximum performance is the goal. If you are building or optimising a website, converting your JPEG and PNG images to WebP is one of the most effective single changes you can make for page speed. WebP is the format Google PageSpeed Insights recommends when it flags "Serve images in next-gen formats."
PNG vs JPEG vs WebP: Quick Comparison
Feature | PNG | JPEG | WebP |
Compression type | Lossless | Lossy | Both lossy and lossless |
Transparency | Yes (alpha) | No | Yes |
Best for | Logos, icons, UI | Photos | All web images |
Typical web size | Larger | Medium | Smallest (20-35% less than JPEG) |
Browser support | 100% | 100% | All modern browsers |

Why Compressing Images Matters for SEO and Page Speed
Image compression is not just a storage-saving exercise. It is one of the most direct and measurable improvements you can make to your website's search rankings, user experience, and Core Web Vitals scores.
Largest Contentful Paint (LCP): Google's Most Critical Speed Metric
LCP - Largest Contentful Paint, measures how long it takes for the main visible content of a page to fully load. On most content websites, the LCP element is an image: the hero image, the featured post image, or a large above-the-fold graphic. Uncompressed images are the single most common cause of LCP failures in Google's Core Web Vitals assessment.
Google's target: LCP under 2.5 seconds. An uncompressed 3 MB hero image on a typical shared hosting plan will almost always fail this threshold. Compressing the same image to 200 KB can push LCP from 5-6 seconds to under 2 seconds, a change that directly improves search rankings. You can read the full guidance on image optimisation in Google's official image optimisation guide.
Page Speed as a Direct Google Ranking Factor
Google confirmed page speed as a ranking signal for desktop in 2010 and for mobile in 2018. Images account for an average of 50% of a typical webpage's total weight. Every uncompressed image on a page adds to the total load time. Compress your images and every visitor, search engine crawlers included, gets a faster, lighter page.
Mobile Experience and Abandonment
More than 50% of global web traffic comes from mobile devices, where slower connection speeds make image weight even more impactful. Studies consistently show that mobile users abandon pages that take more than 3 seconds to load. Compressing your images is one of the fastest ways to reduce abandonment and improve engagement metrics both of which send positive signals to Google.
Bandwidth and Storage Costs
For high-traffic websites, uncompressed images can significantly inflate bandwidth costs. At scale, images that average 500 KB instead of 100 KB mean five times the bandwidth consumed for every page view. Compressing images reduces CDN costs, server load, and storage requirements, particularly relevant for platforms serving hundreds of thousands of images monthly.
For more tools to improve your image strategy, browse all our free tools in the Image Tools category.
How Much Can You Compress an Image Without Losing Quality?
This is the question most people ask when they first start compressing images and the honest answer is: more than you probably expect. For photographs, you can typically reduce file size by 50-70% without any visible quality change when the image is displayed on screen at its normal viewing size.
The Practical Quality Threshold
The human visual system is well-studied in this area. For JPEG images, the quality range between 75% and 85% (on a 0-100 scale) consistently produces files where most viewers cannot detect any quality difference from the original, even when viewing side-by-side. Below approximately 70%, artefacts become visible including blocky areas, blurred edges, and colour banding. Above 90%, file size grows significantly with minimal visible improvement.
PNG images behave differently because PNG uses lossless compression, quality cannot be degraded. PNG compression only affects encode efficiency, not visual quality. The size reduction from PNG compression is therefore more modest (10-25%) but involves zero quality trade-off.
Optimal File Size Targets by Use Case
Use Case | Target File Size | Recommended Format |
Web hero images | Under 300 KB | WebP or JPEG |
Blog content images | Under 150 KB | WebP or JPEG |
Thumbnails | Under 50 KB | WebP or JPEG |
Logos and icons | Under 20 KB | PNG or SVG |
Social media posts | Under 200 KB | JPEG or WebP |
Email inline images | Under 200 KB | JPEG |
E-commerce products | Under 200 KB | WebP or JPEG |
💡 Google PageSpeed Insights flags any image that could be further compressed.
Run your page through pagespeed.web.dev after compressing to confirm your images
pass the "Efficiently encode images" and "Serve images in next-gen formats" checks.
What About Already-Compressed Images?
If an image has already been compressed by another tool or was saved at low quality from a photo editor, running it through a compressor again may actually increase the file size. This is what the -203.11% in the Result table means: the tool found that the existing encoding was already more efficient than what it could produce. In this case, always use the original file.
Image Compression vs. Image Resizing: What's the Difference?
Many people use these terms interchangeably, but they describe two completely different operations. Understanding the difference helps you choose the right tool for the right problem.
Image compression: Reduces the file's data encoding, the image dimensions (width and height in pixels) stay exactly the same. A 1200×800 pixel image compressed from 2 MB to 400 KB is still 1200×800 pixels. Only the file size changes.
Image resizing: Reduces the pixel dimensions of the image. Scaling a 4000×3000 image down to 800×600 pixels makes it physically smaller and reduces the file size, but the image now has fewer pixels and less detail.
When to Compress vs. When to Resize
Use compression when the image is already the correct dimensions for its intended use but the file is too large. For example: a hero image that displays at 1200×630 pixels but was saved as a 4 MB file. Compress it, don't resize it.
Use resizing when the image is physically larger than it needs to be. Uploading a 6000×4000 pixel photo from a DSLR to display as a 600×400 thumbnail is wasteful, resize it to 600×400 first, then compress it.
The best workflow is resize first, then compress. Resizing to the exact display dimensions eliminates the pixel data that's not needed, making the subsequent compression more effective.
Browse other free tools for resizing, converting, and optimising images in the Image Tools category.
What Our Free Image Compressor Can Do
Our tool is built for speed and simplicity. Every feature is free, no premium plan, no usage limits, and no account required for standard files.
- Compress PNG images: Lossless PNG optimisation, reduces file size without affecting transparency or image quality.
- Compress JPEG / JPG images: Lossy compression for photographs and realistic imagery, significant file size reduction with minimal visible quality change.
- Compress WebP images: Support for Google's next-generation format, compress WebP files for maximum web performance.
- Drag-and-drop upload: Drop your image directly onto the upload zone without navigating file dialogs.
- Select a File upload: Browse your device and select images using the standard file picker.
- Result table with size comparison: The Result section shows your original file size, the compressed file size, and the percentage change, so you can see exactly what was achieved before downloading.
- Instant Download: Click the Download button next to any result to save the compressed file immediately no sign-up, no email required, no watermarks.
- Free tier: up to 5 MB per image: Use the tool without creating an account for any image up to 5 MB.
- Logged-in tier: up to 100 MB: Create a free account and log in using the Login button in the top-right corner to unlock file sizes up to 100 MB.
- No quality settings to configure: The tool automatically applies the best compression for each format, no slider, no settings panel, no technical knowledge required.
Lossy vs. Lossless Compression: Choosing the Right Method
Part 1 introduced the definitions. This section is the practical decision guide, the specific scenarios that tell you which method to reach for.
When to Use Lossy Compression
Lossy compression is the right choice for any image where photographic realism matters and where minor, imperceptible quality reduction is an acceptable trade-off for a significantly smaller file:
- Photographs and realistic imagery for websites, blogs, or apps
- Social media images like posts, profile photos, cover images, story graphics
- Hero images, banner images, and above-the-fold graphics
- Product photos on e-commerce pages (viewing versions, not print-ready masters)
- Email newsletter images and campaign graphics
- Video thumbnails, OG images, and Twitter card images
- Any web image where the goal is smallest possible file at acceptable quality
When to Use Lossless Compression
Lossless compression is the correct method whenever pixel accuracy is mandatory, where even imperceptible quality reduction would compromise the image's purpose:
- Logos, brand marks, and icons, every pixel must be geometrically precise
- Screenshots containing text, lossy compression blurs sharp text edges and creates visible artefacts around characters
- User interface elements, buttons, and navigation graphics
- Infographics with charts, graphs, and small-print text
- Medical, scientific, or technical images where data accuracy is mandatory
- Source files you intend to re-edit, lossy compression is irreversible, so always keep originals
Is Lossy Compression Reversible?
No. Once an image has been saved with lossy compression, the discarded data is gone permanently. You cannot "uncompress" a JPEG back to its original quality, you can only decompress to the lossy version that was saved. This is why it is critical to always keep your original uncompressed source files and only compress copies for distribution. Never overwrite your originals with compressed versions.
📌 Best practice: maintain a folder of original, uncompressed source files.
Compress copies for web use, email, and social media.
Never compress the original and save it over itself.
Image Compression Settings for Specific Platforms
Different platforms have different upload limits, compression requirements, and display specifications. Knowing the target for each platform helps you avoid over-compressing (visible quality loss) or under-compressing (files rejected or re-processed by the platform, introducing double-compression degradation).
Compressing Images for WordPress Websites
WordPress uploads images to your server's media library. Large uncompressed files stay there permanently unless you optimise them. Every page that loads those images pays the bandwidth cost on every page view.
Target file sizes for WordPress: under 150 KB for standard blog content images, under 300 KB for hero or featured images. Best format: WebP (all modern browsers support it, and WordPress itself converts to WebP if your server supports it). Compress images using our free tool before uploading, this keeps your media library clean and avoids server-side reprocessing that can produce inconsistent results.
Compressing Images for Instagram
Instagram recompresses all uploaded images using its own algorithms. Uploading an already-compressed image that Instagram then recompresses produces double-compression degradation, quality loss stacking on quality loss. The strategy: upload images at a controlled quality level so Instagram's recompression has clean data to work with.
Instagram specifications: sRGB colour profile, 72 DPI, maximum width of 1080px. Compress to JPEG or WebP at 85-90% quality before uploading. Do not compress aggressively on your end and then let Instagram compress again.
Compressing Images for Email
Most email clients enforce attachment size limits (typically 10-25 MB total per email) but the practical limit for a good experience is much lower. Images over 1 MB in email load slowly on mobile connections and may be stripped or blocked by corporate email filters.
Target: under 500 KB for inline email images. Under 200 KB for images inside newsletter templates. Use JPEG for photographs. Avoid PNG in email unless transparency is required, PNG files are larger and provide no benefit for photographic email content.
Compressing Images for Google PageSpeed
Google PageSpeed Insights flags two image-specific issues: "Efficiently encode images" (images that could be compressed further) and "Serve images in next-gen formats" (images not in WebP or AVIF). Addressing both requires compressing your images and converting to WebP.
Target: under 200 KB per image for standard web pages. Under 100 KB for the LCP (Largest Contentful Paint) image if possible. Compress using our free tool, then re-run PageSpeed Insights to confirm the flags are resolved.
Compressing Images for E-Commerce (Shopify, WooCommerce)
Product images are loaded on every product page and product pages are frequently the highest-traffic pages on an e-commerce site. Unoptimised product images are one of the most common causes of slow e-commerce page scores.
Target: 800×800 pixels minimum for standard product views, under 200 KB. Zoom-capable product images: 1200×1200 pixels, under 400 KB. Use WebP format. Ensure consistent image dimensions across all products, inconsistent sizes cause layout shifts that hurt CLS (Cumulative Layout Shift) scores.
Is It Safe to Use a Free Online Image Compressor?
This is the most important question for anyone uploading personal, commercial, or confidential images to an online tool. The answer depends entirely on how the tool processes your files.
Client-Side vs. Server-Side Processing
Client-side tools: Your images are processed directly in your browser using JavaScript. The image data never leaves your device and no network request containing your image is made. This is the safest possible approach for online image compression.
Server-side tools: Your image is uploaded to a third-party server, processed there, and returned to you. The image travels over the network and is stored on a remote computer, even briefly. For most images this is not a concern but for personal photographs, confidential product images, medical images, or images containing visible personal information, server-side tools introduce unnecessary risk.
What to Check Before Using Any Online Image Tool
- Does the tool explicitly state that images are processed locally in your browser?
- Is the connection HTTPS? (Check for the padlock in your browser's address bar)
- Does it require you to create an account or provide an email address?
- Is there a clear privacy policy that addresses uploaded file handling?
📌 For sensitive images like personal photos, confidential business assets, medical images,
use a client-side browser-based tool or compress locally in Photoshop, GIMP, or another
desktop application where your files never leave your device at all.
How to Check If Your Website Images Need Compression
Before you start compressing, it helps to know which images are the problem and by how much. Here are three free methods to identify unoptimised images on any website.
Google PageSpeed Insights
Go to pagespeed.web.dev and enter your website's URL. Under the Opportunities section, look for two diagnostics: "Efficiently encode images" (images that can be compressed further) and "Serve images in next-gen formats" (images not already in WebP or AVIF). Each flagged image is listed with its current size, the potential compressed size, and the estimated speed improvement. This is the clearest possible view of which images are holding your page speed back.
Browser Developer Tools
Open your browser's Developer Tools (F12 or right-click → Inspect), navigate to the Network tab, and filter by "Img". Reload the page to capture all image requests. Sort by the Size column in descending order. Any image over 200 KB displayed on a web page is a candidate for compression. Any image over 500 KB should be treated as a priority fix.
Google Search Console: Core Web Vitals Report
In Google Search Console, the Core Web Vitals report identifies pages with LCP failures. Click through to a failing page and use PageSpeed Insights to identify which image is the LCP element. That specific image is the highest-priority target for compression, fixing it will have the most direct impact on the page's ranking potential.
For a broader picture of your image presence across the web including tracking where your images appear on other sites our free Reverse Image Search can help you understand your image footprint.
Online Image Compressor vs. Desktop Software: Which Is Better?
Both achieve the same result. The right choice depends on your workflow and the volume of images you're processing.
Factor | Online Compressor | Desktop Software (Photoshop, GIMP etc.) |
Speed for quick tasks | Instant - open browser, upload, done | Requires software to launch and load |
Small batches (1-20) | Best choice, fastest path | Overkill for a handful of images |
Large batches (100+) | May vary by tool limits | Better, batch export with full control |
Offline use | Requires internet connection | Works fully offline |
Cost | Free, no installation | Paid (Photoshop) or free (GIMP) |
Privacy | Client-side = safe for most use cases | Always local, inherently safest |
Technical skill needed | None, single button compression | Moderate learning curve |
Best for | Quick web optimisation, any device | Production pipelines, precise control |
For the majority of web publishing, blogging, social media, and email use cases, an online compressor is the faster, simpler choice. For production image pipelines, bulk processing of hundreds of images, or situations where full control over colour profiles and metadata is required, desktop software is the better tool.
More Free Image Tools
Once you've compressed your images, these related tools from SEO Site Checker help you take the next steps:
- Image Compressor: Compress PNG, JPEG, JPG, and WebP images quickly - free, no account required.
- Reverse Image Search: Find where your images appear across the web. Useful for tracking image usage, identifying stolen content, and understanding your visual presence.
- Image Tools category: Browse all free image tools including compress, resize, convert, and more.
Start Compressing Your Images for Free: Right Now
Compressing your images is one of the highest-impact, lowest-effort improvements you can make to a website, a newsletter, or a social media presence. Smaller files load faster, cost less bandwidth, pass Google's PageSpeed checks, and reach your audience before their patience runs out.
Our free tool handles the technical side automatically, no compression settings to configure, no format conversion to manage, no quality slider to calibrate. Upload your image, click Compress Images, check the Result table, and download. It takes under 30 seconds and is completely free for files up to 5 MB.
-> Compress My Images Free Now - No account. No watermarks. No limits on free files.
Frequently Asked Questions
Frequently Asked Questions (FAQs) is a list of common questions and answers provided to quickly address common concerns or inquiries.
What is the best free image compressor online?
The best free online image compressor is one that processes images client-side in your browser (so your files never leave your device), supports all major formats, requires no account or sign-up, and produces no watermarks on downloads. Our free Image Compressor supports PNG, JPEG, JPG, and WebP with a maximum file size of 5 MB free and up to 100 MB when logged in.
How do I compress an image without losing quality?
Use lossless compression for graphics, logos, and screenshots. PNG compression never degrades quality. For photographs and web images, use lossy compression at 80-85% quality (the standard range where quality reduction is imperceptible to the human eye). Our free tool automatically applies the best compression for each format. Always review the Result table after compressing, the before/after size comparison shows what was achieved.
What image formats does the free compressor support?
Our free Image Compressor supports four formats: PNG, JPEG (.jpeg), JPG (.jpg), and WebP (.webp). These four formats cover the vast majority of web images. Files in GIF, TIFF, BMP, or RAW formats need to be converted to one of the four supported types before compressing. The maximum file size is 5 MB free, and up to 100 MB with a free account.
What does the percentage in the Result table mean?
The percentage in the Result table shows the size change after compression. A positive percentage means the file shrank for example, 60% means the compressed file is 60% smaller than the original. A negative percentage (such as -203.11%) means the file became larger rather than smaller. This happens when an image is already efficiently encoded and the compressor cannot find a more efficient representation. In that case, always use the original file.
Can I compress images larger than 5 MB?
Yes. Create a free account and click the Login button in the top-right corner of the tool. Once logged in, you can compress image files up to 100 MB. The free (no-account) tier supports files up to 5 MB per upload.
Does compressing an image reduce its quality?
It depends on the format and compression method. PNG compression is lossless, it never reduces visible quality. JPEG and WebP lossy compression reduces quality slightly, but at standard web compression levels (roughly 80-85% quality) the difference is imperceptible to the human eye when viewing images on screen. Our tool applies automatic compression optimised for each format. Review the Result table before downloading, the size comparison shows exactly what the tool achieved.
What is the best image format for websites?
WebP is currently the best format for web images. It produces files 20-35% smaller than equivalent JPEG at the same visual quality, supports both transparency and animation, and is supported by all modern browsers. For logos and images requiring perfect transparency, PNG remains the correct choice. For maximum compatibility with older systems, JPEG is the universal fallback. Google PageSpeed Insights recommends WebP when it flags "Serve images in next-gen formats."
How does image compression affect SEO?
Image compression directly improves page load speed, a confirmed Google ranking factor since 2010. Uncompressed images are the most common cause of LCP (Largest Contentful Paint) failures, which form part of Google's Core Web Vitals assessment. Compressing images to under 200 KB per image and converting to WebP format typically resolves the most common image-related PageSpeed flags and produces measurable improvements in Core Web Vitals scores, which are directly tied to search rankings.
Is it safe to upload images to a free online compressor?
It depends on the tool. Client-side compressors process your images locally in your browser, your files never leave your device, making them safe for all images including personal and sensitive content. Server-side compressors upload your image to a remote server, which is fine for most use cases but should be avoided for confidential, medical, or sensitive images. Always check the tool's privacy policy to understand how uploaded files are handled and whether they are deleted after processing.


